Tire Maintenance & Safety
Best price guarantee
Tire replacement coverage
24/7 roadside assistance
Easy returns
Last updated 4/07/2025 - Originally published 4/07/2025
Written by SimpleTire
Flat tires can strike at the most inconvenient times, leaving you stranded on the side of the road. While a spare tire can provide a temporary solution, it's not always practical or available. That's where a tire patch kit comes in handy—a compact toolset that allows you to perform a quick, temporary repair to get you back on the road safely.
Knowing how to use a tire patch kit effectively is an essential skill for any driver. It can save you time, money, and a lot of frustration when faced with a punctured tire. By familiarizing yourself with the components and the process, you'll be prepared to handle this common roadside emergency with confidence.
In this article, we'll dive into the world of tire patch kits, exploring what they are, how they work, and the step-by-step process for using them effectively. We'll also share valuable tips and best practices to ensure a safe and reliable repair, helping you get back on the road with minimal hassle. So, let's get started and learn how to become a tire-patching pro!
What is a Tire Patch Kit?
A tire patch kit is a compact, portable toolset designed to help drivers repair small punctures in their vehicle's tires. These kits typically include a variety of components, such as adhesive patches, rubber plugs, a reaming tool, and an insertion tool. The primary purpose of a tire patch kit is to provide a temporary fix for a punctured tire, allowing you to safely drive to a nearby service station or tire shop for a permanent repair.
Tire patch kits are specifically engineered to handle punctures located in the tread area of the tire—the part that comes in direct contact with the road surface. It's important to note that these kits are not suitable for repairing damage to the tire's sidewall or any other structural damage. When using a tire patch kit, the goal is to seal the puncture, preventing further air loss and ensuring the tire can hold pressure until a professional repair can be made.
One key advantage of having a tire patch kit on hand is that it empowers drivers to take control of their situation when faced with a flat tire. Rather than being stranded roadside waiting for assistance, a well-prepared driver can quickly and efficiently patch the damaged tire, getting back on the road with minimal downtime. This can be especially valuable for those who frequently travel long distances or in areas where roadside assistance may be limited.
It's worth mentioning that while tire patch kits offer a convenient temporary solution, they should not be considered a permanent fix. The adhesive patches and rubber plugs used in these kits are designed to hold up for a limited time and distance, typically long enough to get you to a service station. Once there, it's crucial to have the tire professionally inspected and repaired or replaced as needed to ensure your vehicle's safety and performance.
In essence, a tire patch kit is a valuable tool that every driver should consider keeping in their vehicle's emergency kit. It offers peace of mind and a quick, temporary solution to one of the most common roadside emergencies—a punctured tire. By understanding what a tire patch kit is and how to use it effectively, you can be prepared to handle this situation with confidence, minimizing the stress and inconvenience of a flat tire.
How to Use a Tire Patch Kit

Mastering the use of a tire patch kit involves recognizing its key elements and their functions in mending a flat tire. These kits generally include essential items such as sealing patches, sticky rubber strips, a rasp tool, and a plug insertion device. Each piece is vital in addressing the puncture, ensuring the tire maintains air pressure. Familiarity with these tools allows for quick and effective emergency repairs.
Finding the Leak
Start by identifying the source of the air leak. Conduct a thorough visual inspection of the tire, checking for embedded objects like nails or screws. If the puncture isn't immediately apparent, apply a mixture of soap and water to the tire, looking for bubbles that indicate air escaping. Recognizing typical puncture sources streamlines the process, enabling swift action.
Removing the Foreign Object
Once the puncture is located, carefully extract the culprit. Utilize pliers or side-cutters to remove the object, ensuring the tire is positioned to maximize leverage. This step is crucial in preparing the tire for repair, as leftover debris can compromise the effectiveness of the patch or plug. Proper removal sets the stage for a successful fix.
Prepping the Area
With the object removed, prepare the puncture site for repair. Insert the rasp tool into the hole using a twisting motion to clean and roughen the edges. This step creates the ideal surface for the rubber strip to adhere to, ensuring a secure seal. A well-prepped puncture site is essential for a durable repair.
Preparing the Plug
Next, get the plug ready for insertion. Feed a rubber strip through the eye of the insertion tool, using pliers for assistance if necessary. This setup ensures the plug is positioned correctly for entry into the tire. Proper preparation of the plug is key to achieving an airtight seal.
Inserting the Tire Plug
Now, insert the plug using the prepared tool. Coat the plug with rubber cement if available to enhance the bond. Push the plug into the hole about three-quarters of the way, then twist the tool to set the plug before removing it. This process effectively seals the puncture, allowing the tire to retain air.
Reinflating the Tire
Finish by restoring the tire's air pressure. A portable compressor inflates the tire to the recommended PSI, confirming it is properly filled. Correct inflation is vital for safe driving, impacting handling and tire longevity. After inflation, double-check the repair with a visual inspection and soapy water to ensure it holds firm.
Step 1: Find the Leak
Identifying where a tire is losing air is the first essential step in performing a repair. Start by ensuring your vehicle is on a level surface, which provides easy access and a stable platform for inspection. Use a detailed visual check to spot any visible damage, focusing on the tire tread and sidewalls. Look for any foreign objects lodged in the tire that might have caused a puncture.
For leaks that aren't visually obvious, a different method can be employed. Combine dish soap with water to create a foamy solution. Apply this mixture over the tire using a spray bottle or sponge, paying close attention to potential puncture zones. Watch for bubbles forming, as they will indicate the exact spot where air is escaping. This method is particularly useful for locating leaks that are not immediately visible.
Understanding common causes of tire damage can streamline the inspection process. Sharp objects like nails and screws are often picked up in high-traffic areas or roads under construction. By focusing your search on these common culprits, you can more efficiently pinpoint the leak. Once you have successfully identified the leak, proceed to the next steps of the repair process with confidence and precision.
Step 2: Remove the Foreign Object
After pinpointing the puncture location, the next step involves extracting the cause of the leak with precision. Begin by adjusting the tire's position to ensure optimal accessibility to the punctured area. This adjustment allows for a more straightforward approach, minimizing the risk of additional damage. Secure the tire firmly to maintain stability throughout the extraction process.
For the removal, select the right tools—needle-nose pliers or diagonal cutters are recommended for their precision and grip. Carefully grip the embedded object, applying steady pressure to ease it out without enlarging the puncture hole. Avoid abrupt movements; instead, focus on a gentle, controlled extraction to preserve the tire's integrity.
Once the object is out, closely inspect the puncture site for any residual fragments or irregularities. A thorough check ensures that the hole is ready for the next repair steps, allowing the plug or patch to bond effectively. Proper preparation at this stage is crucial for a reliable repair, ensuring the tire can function safely until a permanent fix is applied.
Step 3: Prep the Area
Getting the puncture site ready is essential for ensuring the patch holds properly and the tire retains air. Start by taking the reamer tool and inserting it into the puncture hole with a deliberate twisting motion. This technique helps to remove any lingering debris and primes the inside surface for the plug. The process ensures that the interior is sufficiently prepared for the next step.
Enlarging the puncture slightly may seem counterintuitive, but it is necessary for a proper fit. By creating a slightly bigger opening, the repair plug can settle more effectively into the space, which minimizes the chance of air leaks post-repair. This adjustment is crucial for forming a tight seal that prevents further air loss, ensuring the repair holds under pressure.
After completing the reaming, examine the area closely for any leftover particles that might interfere with the adhesion. It's important that the surface is clean and adequately roughened to allow the adhesive to work optimally. Proper preparation at this stage is key to facilitating a strong bond between the tire and the patch, ensuring a durable and effective seal.
Step 4: Prepare the Plug
Ensuring the plug is ready for insertion is essential for a successful tire repair. Choose a plug that fits the puncture's dimensions, typically a sticky rubber strip designed to create a tight seal. This choice is crucial for preventing air leaks and maintaining tire pressure, enhancing the effectiveness of the temporary fix.
To prepare the plug, locate the insertion tool's eyelet, which holds the plug in place. Carefully push one end of the plug into the eyelet, making sure it stays centered and aligned. This alignment is important for a smooth insertion into the tire, minimizing the risk of the plug slipping or not sealing properly.
For plugs that resist threading, utilize pliers to guide the plug through the eyelet securely. Firmly hold the plug with the pliers, applying gentle pressure to ease it through. This method ensures the plug is correctly positioned in the tool, ready for application. Properly preparing the plug is key to achieving a reliable seal, allowing the tire to function safely until it can be professionally repaired.
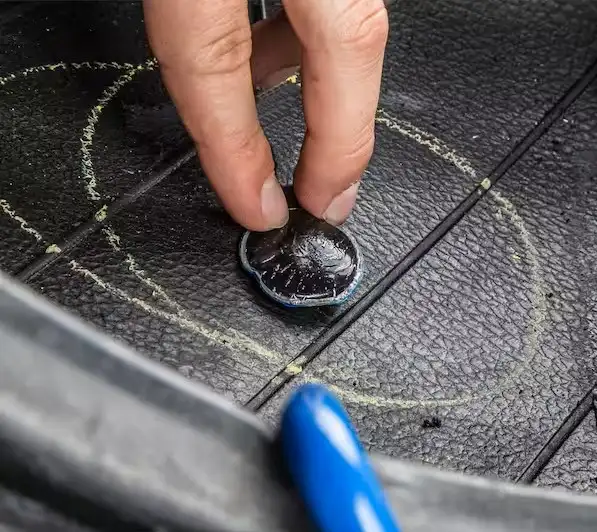
Step 5: Insert the Tire Plug
Securing the tire plug effectively is crucial for maintaining air pressure and ensuring a safe temporary fix. Begin by preparing the plug with adhesive if available; this additional step creates a robust seal by enhancing the plug’s grip within the tire. The adhesive helps fill any small gaps, ensuring the plug stays in place during travel.
With the plug ready, guide the insertion tool into the puncture, positioning it carefully. Insert the plug into the tire's tread until it sits securely inside. This ensures the plug is deep enough to form a reliable seal, minimizing the risk of air escaping.
After the plug is in position, rotate the insertion tool gently. This action helps lock the plug into place, securing it against movement. Once the tool is removed, ensure the plug remains snugly in the puncture. Trim any excess material flush with the tire surface to prevent interference with tire rotation, ensuring a smooth and safe drive.
Step 6: Air Up the Tire
Once the plug is securely in place, it's time to restore the tire's air pressure. Begin by connecting a reliable portable air compressor to the tire's valve stem, ensuring a tight seal to prevent air leaks. Instead of focusing solely on the typical PSI, consider checking the vehicle's tire placard—often found on the driver's door jamb—for the manufacturer's recommended pressure settings.
With the compressor running, keep an eye on the pressure gauge, but also listen for any unusual hissing sounds that might indicate a faulty seal at the valve or plug site. Adjust the compressor's output if needed, gradually bringing the tire up to the specified pressure. This approach ensures the tire is neither underinflated nor overinflated, both of which can affect vehicle handling and tire wear.
After reaching the desired pressure, detach the compressor swiftly and reseal the valve with its cap, ensuring no air escapes. Finally, perform a quick check of the repaired area by applying a light mist of soapy water, confirming no bubbles form around the plug. This step confirms the integrity of the repair, allowing you to resume driving with confidence.
Tips on Effective Tire Repair
Equipping your vehicle with essential tools can significantly enhance your ability to tackle unexpected tire issues. Keeping a tire patch kit on hand is a fundamental aspect of being prepared for emergencies. These kits are designed to provide a swift response to punctures, allowing you to address the problem without delay. Having a reliable manual pump or CO2 inflator can also be a game changer, especially in remote areas where assistance might not be readily available.
It's vital to recognize that tire patch kits are meant as temporary solutions. They are designed to provide a quick fix to get you back on the road, but they don't offer a long-term solution. After using a patch kit, it's important to schedule a comprehensive tire inspection at a service center to assess the tire's condition thoroughly. This step ensures that any underlying issues are addressed, safeguarding your safety during future drives.
Mastering the use of your tire repair tools is essential for efficient roadside repairs. Beyond the patch kit, understanding how to leverage tools like a bead breaker or valve core remover can streamline the repair process. Practicing the use of these tools ahead of time can boost your confidence and proficiency, allowing for a smoother and less stressful experience during an actual tire emergency. This proactive approach equips you to manage tire issues adeptly, ensuring a more secure and reassuring journey.
By mastering the use of a tire patch kit and understanding the step-by-step process, you can confidently handle a punctured tire situation and get back on the road safely. Remember, while a patch kit provides a temporary solution, it's crucial to have your tire professionally inspected and repaired as soon as possible. At SimpleTire, we believe in empowering drivers with the knowledge and tools they need to tackle roadside emergencies, and we invite you to shop for tires online and find the best deals for your vehicle.
Ready to find the perfect tires?
Search By